Configuration
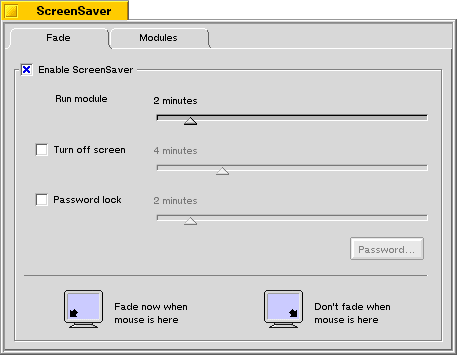
To open the screen saver control panel, go into the Be menu, open the Preferences menu, and select ScreenSaver.

If the "Enable ScreenSaver" box isn't checked, do it. Then click on the "Modules" tab.
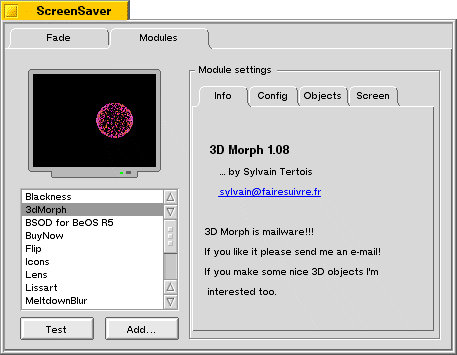
On the left you have a list of all the screen savers installed on your system. Select "3DMorph" and your panel will look like this. In the "Modules settings" box, there are four different tabs. The first one, "Info", just gives you some information about 3D Morph.
The "Config" tab lets you fix how the 3D objects are displayed. "Morphing speed" lets you chose how fast an object tranforms into another one. "Morphing pause" lets you set how long 3DMorph will wait between two morphs. "Movement speed" and "Rotation speed" fix the speeds at which the objects move and turn, respectively.
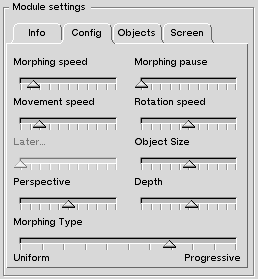
The "Later..." slider isn't used yet, but it will in the future. The "Object size" slider adjusts the size of the objects shown. If you put it too big (more than 50%), objects will exceed the screen boundaries. "Perspective" lets you adjust the perspective. Setting the perspective to a high value can do some interesting distortions. The "Depth" parameter makes distant points darker, and close ones brighter.
3DMorph uses two different ways to make an object morph into another one: with a uniform morphing, all the points from one object move at the same time to make a new object. With a progressive morphing, some points move before other ones. Just play a bit with the saver and you'll understand what I mean. The "Morphing Type" slider lets you chose how often you want some uniform and progressive morphings. If you put the slider near "Uniform", you'll have more uniform morphings, and if you put it near "Progressive", you'll have more progressive morphings.
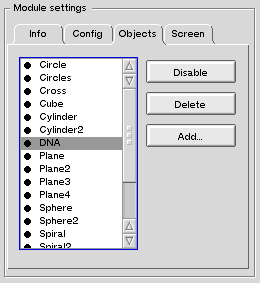
The "Objects" tab lets you choose which 3D objects are used in the screen saver. You have on the left a list of all the objects. Those who have a black spot on the left are enabled. You can disable an object by selecting it and clicking on "Disable". Disabled objects won't appear anymore when the screen saver is active. To enable an object again, select it and click on the "Enable" button. If you really don't like an object, you can delete it by selecting it and clicking on the "Delete" button. The "Add..." button is the most interesting one: it lets you add new 3D objects. You can download more objects, or you can create your own ones.
The "Screen" tab lets you configure how the screen saver draws on the screen. Double buffering is the best way to avoid flicker. If you select it, you'll be able to choose a resolution and color depth. If your screen stays black when you test 3DMorph with double buffering, there can be several reasons:
- You don't have enough RAM in your graphics card to hold the second buffer. Try using a lower resolution and/or color depth.
- The 1152*900 modes don't seem to work on some cards. Try using another resolution.
- Your graphics card, or driver, doesn't support frame buffer control. In that case, try using the "software" option. This option works with all graphics cards, but uses a lot more CPU. So on some systems, the animation may look jerky. In that case, you can try and disable "Double Buffering", and play with the "Wait for retrace" option.
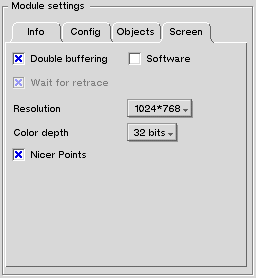
The "Nicer Points", as his name implies, uses a better 3D renderer to show the objects. It produces nicer and brighter points, but is more CPU intensive. You can desactivate it if you have a slow processor, or if you prefer the old style.